

Introduction: Sturdy CNC Plywood Step Stool


I needed a nice new stool that I could use rather multifunctionally - as both a step stool to reach high shelves and as an extra seat. This means I need a stool that is high and has a wide enough seat for sitting, as well as the extra step so that it's convenient to climb.
I designed this stool parametrically so its quite adjustable to be wider, shorter, taller , anything.
I designed it for 1 sheet of 0.5 inch 4x4 plywood - you can get whatever grade plywood you like, but I am kinda cheap, so I got the cheapest sanded plywood and spent a lot of time finishing and painting it to make it look cleaner and more presentable.
Supplies
Materials:
- 4' x 4' x 15/32" plywood sheet
- Spray Paint
- Titebond II wood glue
- Furniture pads
Supplies:
- Sandpaper (80 - 400 grit)
Tools:
- CNC router with 1/4 inch flat endmill
- Fusion 360
- VCarve (for CAM, but can also be done in fusion360)
- Sander (Orbital or detail)
Step 1: Parametric Design in Fusion360


One interesting feature of the CAD is that I made the design rather parametric. Its something that I have been practicing and trying to get better at. Basically I encoded the specs of the stool into these fusion360 parameters so that if I wanted a taller stool or a thinner stool (shown in pics 2 and 3), I can edit a simple parameter and generate a whole different stool easily!
Step 2: Generating CNC Files From CAD


Using the CAD, I generated dxfs of all the components and opened it in vcarve. I used vcarve pro to generate 3D cuts for the CNC router in Maker's Workshop. Its very easy in vcarve because you can just pull in dxfs, click on the vector and generate a 2d toolpath for a 1/4 inch endmill bit. I know the 1/4 inch bit won't make sharp corners for inserts, but we will rectify this issue later.
Here is a detailed video that shows how to generate toolpaths if its your first time with vcarve:
I used the software to add tabs and bridges - which are the little pieces of wood connecting the cutout piece to the original stock. This prevents the cutout piece from dislodging and hitting the bit in the machine when it is fully cut.
I have attached the files as an example.


Step 3: CNC the Parts Out of the Plywood


Using the G-code file I generated from vcarve, i loaded it into the CNC at Maker's Workshop and loaded my 4x4 sheet. I had to cut the 4x4 into two 2x4 sheets because the vacuum table could hold only one half-sheet at a time.
I aligned the machine to my material to set the machine starting point (also called the machine home) and hit run on the g-code to cut out the pieces.
Step 4: Cutting Out the Pieces From the Tabs


I used a jig saw to cut the tabs I had added. In doing so, I freed all the individual pieces from the stock. I was able to get a pretty clean cut with the jigsaw since the tabs were small.
Step 5: Shaping the Edges of the Inserted Pieces


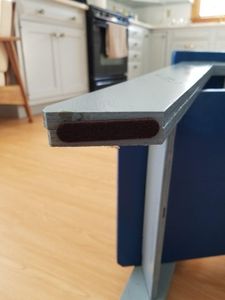
You'll notice because we used a 1/4 inch endmill to cut the piece, the sharp-edged brace pieces do not fit into their respective holes which have a rounded corner. To fix this, we just need to sand the edges of the brace down a bit. I just hit the edges with a belt sander and tested them until they fit the insert hole as shown in the pictures.
Step 6: Sanding. So Much Sanding...


This wasn't just a piece that people would be stepping on - this is a piece that people would be sitting on and stepping on with bare feet. I could not risk any splinters or sharp bits of wood left on any surface. Whether its the seat/step part where people would be sitting or standing, or even on every edge, where people would be lifting the stool from, I need to make sure every surface was smooth.
I worked up from 80 grit which removed big imperfections, all the way up to 220 grit, which gave a nice enough surface finish for painting.
Step 7: Gluing the Pieces


I decided which sides I wanted as the visible sides of the seat/legs, then I glued together all the opposite sides of the duplicate pieces to get thicker seats and legs. This makes the stool very sturdy.
I used Titebond ii as my wood glue. Make sure you get good "squeezeout" of glue around the edges as shown in the second picture. That means you've applied ample glue to bond the two pieces of wood.
Step 8: Clamping


Once you've glued the pieces together, you need to firmly clamp the pieces together so they don't slide apart and glue can seal the gap between the two pieces.
For the legs and steps, I used thebrace inserts to align the legs together after gluing, then I clamped them (shown in picture 1). I removed the brace inserts afterwards so that they would not get glued into the legs permanently.
Let the glue dry for 24 hours before unclamping.
Step 9: More Sanding...


Now I sanded 80 grit to remove the dried glue and all the way to 400 grit. That is the surface finish I wanted for a seat and any paint I apply after will sit very evenly on the surface, since it is so smooth.
Step 10: Painting


I spray painted the legs light gray and the steps blue to match the color scheme of the house I made this for. I made sure to get the edges really well because I did not want any of the original plywood to show through. I did multiple coats of paint to get a smooth and glossy finish.
Step 11: Assembly


- Insert the two bigger braces into the bottom step (the bigger of the two steps), making sure you insert the pieces into the side you want on the bottom of the stool so the visible side is on top.
- Attach one of the side legs
- Attach the smaller brace to the top hole of the leg
- Attach the last legs
- Attach the top
I chose to glue the pieces all together, but if you want your stool to be disassembly-friendly, you don't have to glue them.
I wiped any dripping glue so that the smooth painted surface did not get ruined.
Step 12: Finishing Touches


And there we have it!
A beautiful stool made from rather cheap materials. (Okay a CNC router isn't cheap, but you could get the same effect with a hand drawn template and a jig saw. I was trying to learn a new tool and thought this was a good starting project)
I added furniture pads so as not to scratch the floor on sliding it around.
The files for this project are attached.
I think it compliments the room very well, and is quite multifunctional!
Happy building!


Runner Up in the
One Board Contest


